Tuesday, June 21, 2011

Ice Cream without a machine + Chocolate Almond Milkshakes!

chocolate almond milkshakes!

While I was in Atlanta for Blogher Food, Elissa, Lauren, Tessa, Kamran and I ate at the restaurant Yeah! Burger. Twice. Needless to say, it’s pretty dang good. They have hands down, the best turkey burger I have ever tasted.

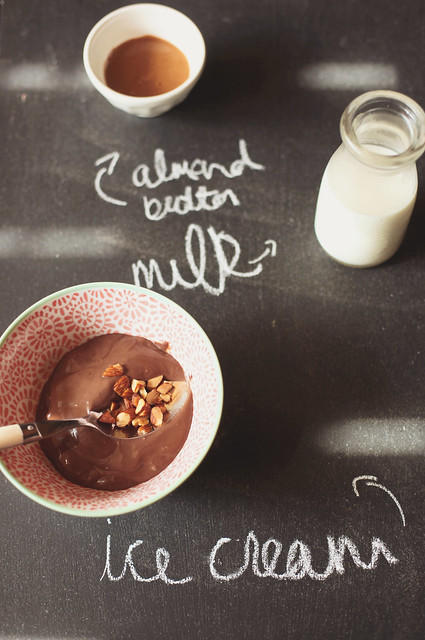
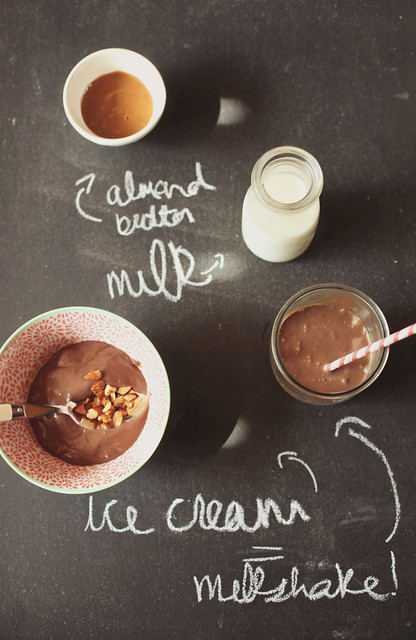
Along with the really good turkey burger, they also have excellent shakes. The peach flavor is amazing, but the one that really stuck out to me was the chocolate almond. It’s a basic chocolate shake, but with almond butter mixed in. I wasn’t sure if I’d like it, but I LOVED it.

IMG_2807 copy-2

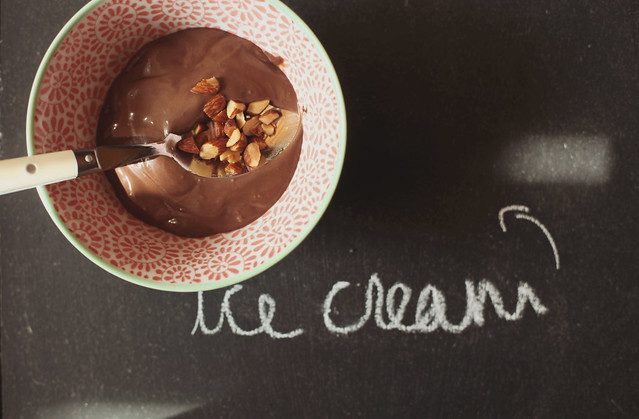
Since I don’t have a Yeah! Burger right down the street, I decided to recreate it at home. You could just use store bought chocolate ice cream, but homemade is so much better. This recipe I used is from David Lebovitz, ice cream genius. It’s the most creamy, rich chocolate ice cream ever. The best part? I didn’t use an ice cream maker! I have one of those huge, vintage wannabe ice cream makers, which is terribly loud and requires a massive amount of ice and rock salt. I hate lugging it out, so I googled “how to make ice cream without a machine” and landed on this page, also from David Lebovitz. Head over there for the method!

If you want to make ice cream without a machine, the key is to use a custard base, not one of those recipes for super quick, no cook ice cream, which are always too icy and not at all creamy. It takes more work, lots of stirring and cooling, but in the end it is so worth it.

IMG_2839 copy-2

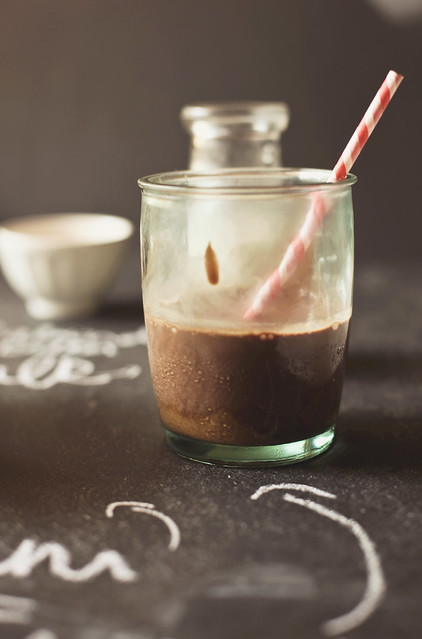
The milkshake part is much easier than the ice cream part! Just dollop a few spoonfuls of almond butter into a glass, add ice cream, a little milk, and stir. The ratios are completely up to you. Want it super almondy? Add more almond butter. Want it really thick? Add less milk. I also like to stir in some very finely chopped lightly salted almonds and top it with shaved semi sweet chocolate.

Seriously y’all. Try this out. Both the shake and the ice cream! It’s the perfect way to ring in summer.

chocolate almond milkshakes!

Chocolate Ice Cream
from The Perfect Scoop by David Lebovitz

2 cups heavy cream

3 tbsp unsweetened Dutch-process cocoa powder

5 oz bittersweet or semi-sweet chocolate, chopped

1 cup whole milk

3/4 cup sugar

pinch of salt

5 large egg yolks

1/2 tsp vanilla extract

Warm 1 cup of cream with cocoa powder in medium saucepan, whisking to thoroughly blend the cocoa. Bring to boil then reduce heat and gently simmer for 30 seconds, whisking constantly. Remove from heat and stir in chocolate until smooth. Stir in remaining cup of cream.

Pour mixture into a large bowl, scraping the saucepan as much as possible. Set mesh strainer atop the bowl. Warm milk, sugar, and salt in the same saucepan. In a separate medium bowl, whisk together the egg yolks. Slowly pour the warm milk into the egg yolks, whisking constantly, then scrape the warmed yolks back into the saucepan. Stir mixture constantly over medium heat making sure the scrape the bottom and corners, until the mixture thickens and reaches custard consistency.

Pour custard through strainer and stir it into the chocolate until smooth, then stir in the vanilla. Continue to stir over ice bath until cool. Refrigerate the mixture to cool thoroughly and then freeze it in your ice cream machine per the manufacturer’s instructions, or follow the instructions here. Yields 1 quart.

Thursday, June 09, 2011

Cherry Almond Crumble

IMG_2153 copy-2

Every year, around this time, I’m reminded of how much I adore cherries. I forget about them during the long winter, those days when fresh fruit is scarce. Then, as soon as I see them in the grocery store, I snatch them up, not giving a second thought about the $10 price tag.

IMG_1978 copy-2

I love that not only are they tasty, they are absolutely beautiful. There’s lots of pretty fruit out there, but I think cherries win the beauty contest, hands down. All those shades of red, their shiny skin, their ombre interior.

pitting cherries

Today was the first time this season I seen them in the grocery store, so I grabbed a bag and brought them home to make this crumble. I’m an absolute crumble/crisp fiend, I think it’s the perfect way to bake with fruit. The flavor of the fruit it’s self really shines through, and the crunchy topping only adds to the deliciousness.

sweet cherries for a cherry almond crumble

IMG_1989 copy-2

This recipe is loosely based on a recipe for a rhubarb, oat & pecan crumble from one of my favorite cookbooks, Rustic Fruit Desserts. While that recipe sounded great, I knew I wanted to bake with cherries and almonds, so I used it as an outline for what you see here. It turned out wonderfully, cherry and almond go so perfectly together. I used dark brown sugar in the cherries, to add a richer flavor, along with some almond extract.


sweet cherries

This is best served fresh out of the oven, topped with vanilla bean ice cream. Let the ice cream melt into the crumble a little bit, it adds a creaminess that makes it taste even better.

cherry almond crumble

Cherry Almond Crumble
adapted from Rustic Fruit Desserts

Crumble

3/4 cup all purpose flour
1/2 cup old fashioned rolled oats
1/2 cup packed light brown sugar
3/4 cup sliced almonds
1/2 teaspoon fine sea salt
1/2 cup unsalted butter, melted

Cherry Filling

1 1/2 pounds fresh cherries, pitted
1/3 cup dark brown sugar (more or less, depending on your taste)
1/2 teaspoon almond extract
1 tablespoon cornstarch

Preheat the oven to 350. Butter a 8x8 baking dish (or 3 smaller dishes, like I used here)

To make the crumble, mix the flour, oats, brown sugar, almonds and salt together in a bowl. Stir in the butter, then press the mixture together in your hands to form clumps.

To make the cherry filling, mix together the cherries, brown sugar, almond extract and cornstarch.

Transfer the cherry mixture into the prepared pan and scatter the crumble topping over the top. Bake for about 45 minutes, until the topping is golden brown and the filling is bubbling.

Wednesday, May 25, 2011

Chocolate Buttermilk Cupcakes with Mint Infused Whipped Cream

chocolate buttermilk cupcakes with mint infused whipped cream.

This past weekend I attended (and spoke at) the Blogher food conference. I wish I had a great, in depth rundown for you, but I find myself still processing it. It was fantastic to finally meet my friends from the kitchen generation, overwhelmingly fantastic, actually. It was like we had known each other for years and years. We shared hotel rooms, went to dinner together, and laughed late into the night. I also met some other really fantastic people, folks who’s blogs I’ve read for ages. That was surreal.

1-3

IMG_1464 copy-2

I went to several of the sessions, but the one that has really stuck with me was the amazing photography & food styling session with Aran, Tami and Stephanie. It was the only session in which I took notes - pages of them. The way they talked about their evolution, passion & technique was inspiring.

IMG_1480 copy-2

As soon as I got home, all I wanted to do was take pictures. Monday & Tuesday were so busy though, today was the first time I’ve had the chance.

2-2

IMG_1539 copy-2

I tried implementing a few of points that they made, I’m not sure how successfully, but it was great to have that new knowledge to work from. Thanks for the inspiration, ladies!

3-2

While out running errands this morning, I picked up this pretty little mint plant. I knew immediately what I wanted to make, an idea that had been bouncing around in my head for a while. The cupcake it’s self is rich and moist, using the fantastic Scharffen Berger cocoa powder I received at the conference, and buttermilk. I’m in love with Scharffen Berger products. If you have a chance, pick up one of their mocha dark chocolate bars. They will blow your mind.

Since it’s been so warm lately, I decided I wanted to make this a little bit lighter than your usual cupcake, opting to use a whipped cream instead of buttercream. I infused the cream with the mint, and sweetened it lightly. I think this is my favorite cupcake topping, ever. Infusing it with real mint as opposed to using mint extract is what makes it so good.

IMG_1638 copy-2

Chocolate Buttermilk Cupcakes with Mint Infused Whipped Cream
Cupcakes adapted from Martha Stewart

3/4 cup all-purpose flour
3/4 cup sugar
1 teaspoon baking powder
1/2 teaspoon baking soda
1/4 teaspoon salt
7 1/2 tablespoons unsweetened cocoa powder
3 tablespoons unsalted butter, melted
7 tablespoons buttermilk
1 large egg
1 large egg white

Directions
Preheat oven to 350 degrees. Line 12-cup muffin tin with paper liners. In a large mixing bowl, combine flour, sugar, baking powder, baking soda, and salt; set aside.

With an electric mixer, combine cocoa and 5 tablespoons hot water until a thick paste forms (this process intensifies the chocolate flavor). Add butter, buttermilk, egg, and egg white; beat until combined. Whisk in flour mixture until smooth.

Scoop batter into prepared tin. Bake until a toothpick inserted in the center of a cupcake comes out clean, about 20 minutes. Transfer cupcakes to a wire rack to cool completely.

Top with whipped cream, recipe below

Mint Infused Whipped Cream

2 cups heavy whipping cream
3-4 sprigs, fresh mint (i used sweet mint, you could use spearmint, peppermint, chocolate mint, etc)
2-3 tablespoons powdered sugar (more if you like it sweeter)

Crush mint leaves a bit, then place in a medium sized bowl, pour heavy cream over. Cover the bowl with plastic wrap and refrigerate 6 hours to overnight (i refrigerated for about 5 hours, and while the cream was minty, it wasn’t nearly minty enough. I’d recommend keeping it in the fridge overnight.)

Remove mint from heavy cream, add powdered sugar and by hand or using an electric mixer, whip until soft peaks form.

Monday, May 09, 2011

honey & jam tarts

IMG_0509 copy

Oh, sweet Spring. I am so in love with you. Your warm days and cool nights, bright green leaves and colorful blooms. Could anything be better? I’m don’t think so.


honey & jam tarts

IMG_0502 copy

Lately, my evenings have been filled with picnics & trips to the park, time spent savoring the longer days. We’ve been slowly harvesting strawberries from our strawberry patches, making spring even more sweet.

IMG_0564 copy


IMG_0602 copy

Those strawberries certainly inspired this tart in part, and I thought it would be fun to bake something inspired by my blog name, which I’ve never done before.


IMG_0520 copy

These tarts are so simple, and easily adaptable to your taste. The base is full of honey, the flavor comes through nicely. Here, I’ve use a lovely strawberry & black pepper jam the folks at The East India Company were kind enough to send me. You could use any flavor you’d like, though.

IMG_0608 copy

honey & jam tarts
crust recipe adapted from Bon Appétit
make 3 small tarts


1 3/4 cups all purpose flour
2 tablespoons sugar
1/2 teaspoon salt
1/2 cup cold unsalted butter, cut into 1/2-inch cubes
1/4 cup honey
2 large egg yolks
jam of your choice
fruit of your choice

For crust:
Mix flour, sugar,and salt in processor. Add butter; using on/off turns, process until mixture resembles coarse meal. Whisk honey,and yolks in bowl. Add honey mixture to flour mixture; using on/off turns, process until clumps form. Gather dough into ball; flatten into disk. Wrap in plastic; chill 1 hour.

Roll dough out on floured surface to 12-inch round. Transfer to 10-inch tart pan (or three individual sized tart pans) with removable bottom. Press dough onto bottom and up sides of pan. Fold overhang in; press to form double layer. Cover and chill 30 minutes or up to 1 day.

Preheat the oven to 350. Remove tart pans from fridge, spread a layer of jam into the bottom. Bake for 15-20 minutes. Allow to cool, top with fresh fruit.

Enjoy!