Monday, June 29, 2009

zucchini bread: part two.


cucumbers and zucchini

You know back when I posted the zucchini cheddar bread I said I didn’t like sweet zucchini bread? Well I’ve changed my mind.

zucchini bread

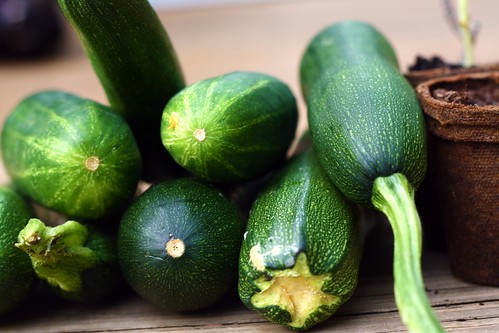
Last Saturday a guy at the farmers market gave me a whole bunch of free zucchini. Like, 8-ish. That’s a lot of zucchini. So I figured the best way to use it was try some new bread recipes, see if I could find one I could use for the farmers market. And since most people seem to prefer sweet zucchini bread, I gave in and tried it.

one speckled egg.

I was preparing myself to hate it. Which is stupid because I haven’t even had any in years. But I was sure I was going to have to spit it out. I’d built it up in my head, kind of like getting a shot at the doctor (I realize I’m crazy. haha).

zucchini bread

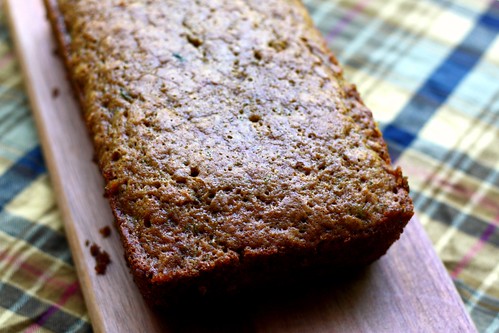
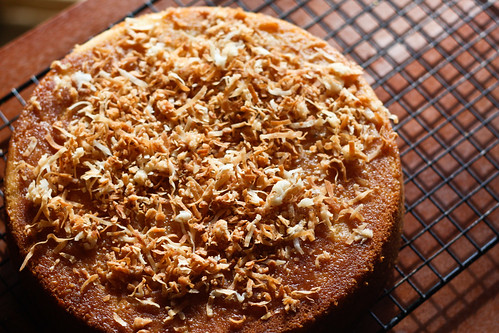
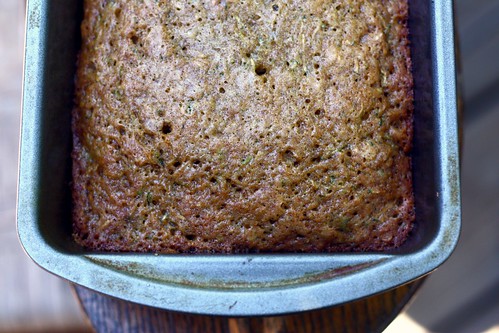
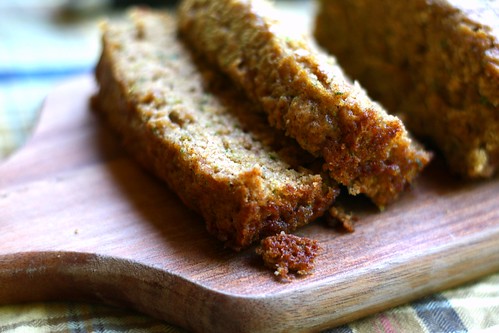
But it was delicious! So moist, and not crazy, overpoweringly sweet. Kind of dense, but in the best way possible. And is was so, so easy to put together. Plus, it’s gorgeous. Dark brown and kind of rustic looking. I’m so glad I tried it again, it was so worth it. You should try it too!

zucchini bread

Zucchini Bread
adapted from allrecipes.com

3 eggs
3/4 cup vegetable oil
1 2/3 cups packed brown sugar
2 cups grated zucchini
2 teaspoons vanilla extract
3 cups all-purpose flour
3 teaspoons ground cinnamon
1 1/2 teaspoons baking powder
1 teaspoon baking soda
1 teaspoon salt
1/2 cup raisins (optional)
1/2 cup chopped walnuts (optional)

Stir together the flour, cinnamon, baking powder, baking soda, and salt.

In a large bowl or electric mixer beat the eggs well. Add the oil, brown sugar, zucchini, and vanilla. Mix well.

Lightly stir in the flour mixture. Add raisins and nuts, if using.

Pour batter into a greased and floured 9 x 5 inch loaf pan.

Bake at 325 for 45 minutes, or until a toothpick inserted in the middle comes out clean.

Enjoy!

Friday, June 26, 2009

Lemon Whoopie Pies

lemon whoopie pies.

A couple of weeks ago I emailed Charity of Sweet Charity Pie and asked if she wanted to try out a new recipe again, after our very successful zucchini cheddar bread. She said yes and suggested we make these lemon whoopie pies.

I was ecstatic, I love whoopie pies. I remember the first time I had one - I was in Amish country in Pennsylvania. I went into this little shop run by mennonite women and saw them. They looked like giant oreos, I had to try one!

lemons.

It was a culinary experience. So delicious. I’ve tried several time so recreate the whoopie pie I had that day, but I’ve never come close.

So it was nice to try this variation on the chocolate cookie/cream filling. The lemon version is much lighter than the traditional one, slightly more tart. The cream cheese filling was so nice, creamy and lemony. I’ll definitely be making these again.

Thanks for the suggestion, Charity! I loved them.

Lemon Whoopie Pies

the Big Fat Cookie book via Joy the Baker

makes 8 giant cookies

1 1/2 cups all-purpose flour

1/2 teaspoon baking powder

1/4 teaspoon baking soda

1/4 teaspoon salt

6 Tablespoons (3/4 stick) usalted butter, at room temperature

1 cup sugar

1 teaspoon finely grated lemon zest

1 large egg

1 Tablespoon fresh lemon juice

1 teaspoon vanilla extract

1/2 cup buttermilk.

Lemon Cream Cheese Filling

6 Tablespoons (3/4 stick) unsalted butter, at room temperature

6 ounces cream cheese, at room temperature

1 teaspoon vanilla extract

1 teaspoon finely grated lemon zest

2 Tablespoons lemon juice

2 3/4 cup powdered sugar

Position a rack in the middle of the oven. Preheat the oven to 350 degrees F. Line two baking sheets with parchment paper and butter the paper.

Sift together the flour, baking powder, baking soda, and salt into a medium bowl and set aside. In a large bowl, using an electric mixer on medium speed, beat the butter, sugar and lemon zest until smooth, about 3 minutes. Stop the mixer to scrape the sides of the bowl as needed during the mixing. Add the egg, lemon juice and vanilla, mixing until blended, about 1 minute. The batter may look curdled. On low speed, add half of the flour mixture, mixing just to incorporate it. Mix in the buttermilk. Mix in the remaining flour mixture just until it is incorporated and the batter looks smooth again.

Drop heaping tablespoons (about 3 level Tablespoons each for a giant cookie) of dough onto the prepared baking sheets, spacing them about 3 inches apart. Bake the cookies one sheet at a time until toothpick inserted in the center comes out clean and the tops feel firm, about 12 minutes. With the exception of a time line at the edges, the tops of the cookies should not brown. Cool the cookies on the baking sheets for 10 minutes, then use a wide metal spatula to transfer them to a wire rack to cool completely.

To make the filling-

In a large bowl, using an electric mixer on low speed, beat the butter, cream cheese, vanilla, lemon zest and lemon juice until thoroughly blended and smooth, about 1 minute. Add the powdered sugar and mix until smooth. If the filling is too soft to hold its shape, chill it in the refrigerator for about 30 minutes.

Turn half of the cookies bottom side up. Leaving a 1/4-inch plain edge, use a thin metal spatula to spread each one with about 1/4 up of filling. Gently press the flat bottoms of the remaining cookies onto the fillings.

Wrap each cookie in plastic wrap and refrigerate for at least 1 hour. Serve cold. The wrapped cookies can be stored in the refrigerator for up to 4 days.

Wednesday, June 24, 2009

Pecan Sandies

toasted pecans

I LOVE Sandies. Pecan Sandies in particular. I love how they melt in your mouth, so buttery and delicious. I buy them every time they are on sale at the grocery store. They are my absolute favorite cookie, I once ate a whole line of them out of the box in one sitting (and felt very sick afterwards.).

pecan sandies

But I have never made them myself, until now. I’d always kind of avoided them, refrigerator cookies and I don’t always see eye to eye. I want them to be easy to roll out, they refuse. That’s why I stick with chocolate chip.

I was browsing through the recipes on Smitten Kitchen the other day and these caught my eye. Why pay 4+ bucks a pack when you can make them yourself?

pecan sandies

I’m SO glad I did. These are so easy to make, and so delicious. When the pecans came out of the oven, I knew they were going to be good. You’ll be knocked over by how good it smells, all warm and toasty. The first time I made them I rolled them out to thin, they fell apart when you tried to pick them up. The second time I rolled them out a little too thick. Maybe the third time will be the charm. But no matter what, they were delicious.

pecan sandies

Pecan Sandies
Adapted from Last Course via Smitten Kitchen

1 cup pecans
2 cups all-purpose flour
1 cup (2 sticks) unsalted butter, softened
2/3 cup confectioners’ sugar
2 teaspoons vanilla extract
1 teaspoon salt
1/2 teaspoon baking powder
2 tablespoons turbinado (raw) sugar

Preheat the oven to 350 degrees F. Spread the nuts out in one layer on a baking sheet and bake them, stirring occasionally, until they are well browned, 10 to 13 minutes (they will smell toasted and nutty). Transfer the pan to a wire rack to cool.

In a food processor, grind the nuts with 1/4 cup of the flour. Set aside.

Using an electric mixer, beat the butter and sugar until creamy and smooth, about 2 minutes. Add the vanilla and beat well. Sift together the remaining 1 3/4 cups of flour, the salt, and the baking powder, and add it to the dough, mixing until just combined. Stir in the nut mixture. Form the dough into a disk, wrap in plastic wrap, and chill for at least 3 hours.

Preheat the oven to 325 degrees F. Roll the dough between two sheets of wax paper to 3/16 inch thick (a rectangle approximately 10 x 14 inches). Using a sharp knife, cut the dough into 1-inch squares, then cut the squares on a diagonal into triangles (I skipped the last cut into triangles). Sprinkle the cookies with the turbinado sugar. Place them 1 inch apart on ungreased cookie sheets (do not reroll the scraps). Prick the cookies with a fork and bake until pale golden all over, about 10 to 12 minutes. Cool on a wire rack.

Sunday, June 21, 2009

The Winner is...

winner

Sara from Cupcake Muffin!

Congrats, Sara, I hope you enjoy your new microplate grater!

Thanks to everyone who entered my contest!

You know back at the beginning of the week, how I said I was going to have lots of new recipes to post this week? Well, as it turns out, life got in the way and although I've baked, I haven't been able to put together blog posts yet! But I promise they are coming soon!

Tuesday, June 16, 2009

Lime Coconut Cake and a Giveaway!

lime coconut cake

My life has gotten crazy busy. Between my job at the farmers market, baking for the farmers market, the garden, the chickens, landscaping for my parent’s business, I haven’t had any time to bake what I wanted.

Which totally stinks because I have SO much stuff on my to-bake list. I’ve had to start scheduling my baking on a calendar. It’s crazy.

toasty coconut

But I do enjoy the being busy, I absolutely love my new job, it’s like a dream. The people are so sweet and it’s so great to have that sense of community.

lime coconut cake

So I’m happy, just busy. Today when I got home from work, I was sweaty, tired and unmotivated, but I wanted, needed to bake. I looked through the recipes I had printed off and bookmarked to see what would be the easiest and tastiest. I decided on this key lime coconut cake from smitten kitchen. I had all the ingredients, plus I really wanted to use my new microplane grater. Sad, but true. I LOVE this thing. It’s amazing. It zests so quickly and so completely. I’ll never go back to another grater/zester.

microplane zester

I love it so much I want to give you one! I’m giving away 1 microplane zester to a lucky commenter that I’ll choose randomly through random.org.

What to do to enter:
Enter once by leaving a comment on this post and a way to contact you if you don't have a blog.
Enter a second time by twittering about the giveaway to @honeyandjam AND leaving a ANOTHER comment on this post.
Enter another time by posting about this giveaway on your blog AND leaving ANOTHER comment on this post.

No entires after 10 pm EST this Saturday, June 20th.

I’ll select one winner through random.org next Sunday.

Anyway, back to the cake. It was DELICIOUS. Oh my word. One of the best things I’ve made in a while. So moist and fluffy and flavorful. You should definitely make it. And soon.

lime coconut cake

Key Lime Coconut Cake
Gourmet, March 2009 via Smitten Kitchen

I didn’t have key limes, so I used regular limes and they worked perfectly.
Serves 8.

1 cup sweetened flaked coconut
1 stick unsalted butter, softened
1 1/4 cups granulated sugar
1 tablespoon grated Key lime zest
2 large eggs
1 3/4 cups self-rising flour (or just add 1 teaspoon baking powder and 1/2 teaspoon salt to all purpose.)
3/4 cup whole milk
1/4 cup fresh Key lime juice, divided
1 cup confectioners sugar
1 tablespoon rum (optional)

Preheat oven to 350°F with rack in middle. Generously butter an 8- by 8-inch square or 9- by 2-inch round cake pan and line bottom with a round of parchment paper.

Toast coconut in a small baking pan in oven, stirring once or twice, until golden, 8 to 12 minutes. Cool. Leave oven on.

Beat together butter, granulated sugar, and zest with an electric mixer until fluffy. Beat in eggs one at a time. Stir together flour and 1/2 cup coconut (reserve remainder for topping). Stir together milk and 2 tablespoons lime juice. At low speed, mix flour and milk mixtures into egg mixture alternately in batches, beginning and ending with flour.

Spoon batter into pan and smooth top. Bake until golden and a wooden pick inserted into center comes out clean, 40 to 45 minutes. Cool to warm, then turn out of pan and discard parchment.

Whisk together confectioners sugar, remaining 2 tablespoons lime juice, and rum (if using, if not use milk) and pour over cake. Sprinkle with remaining coconut.

Saturday, June 13, 2009

etsy

I've got several new prints up on etsy! You can check them out (and buy them!) here.

This coming week is going to be a busy one - I've got so much lined up to bake! So expect lots of recipes in the coming days.

Thursday, June 11, 2009

Daylilies from the Garden.

daylilies

daylilies

daylilies

Daylilies are so resilient! These were actually tilled under completely earlier in the spring and they've popped back up and are bigger than ever. It's so amazing.

Tuesday, June 09, 2009

Apricot Crisp

apricot crisp

Yesterday I was roaming through the grocery store and these apricots caught my eye. Not because I wanted to bake with them, but because they were totally gorgeous and I wanted to take pictures of them. If I could spend the rest of my days simply taking pictures of fruit, I'd be a happy girl. Of course I realized I was going to have to do something with them once I got them home, but I hadn’t a clue what.

apricots

So after I spent a while photographing them I began searching for a way to use them. All the recipes I was finding called for things I didn’t have, Almond flour, apricot jam, etc. Then I finally came upon this recipe from Smitten Kitchen for Apricot Crisp.

apricots

I absolutely love crisps and generally think the world would be a better place if everyone had some every morning. For me, the fruit is really more of a vehicle for the topping. That oaty-crumbly goodness.

apricots

But what’s so great about this crisp is that the tartness of the apricots is really balanced out by the sweetness of the topping. It’s perfect! And so, so delicious. It’d be great with yogurt or even a little ice cream!

apricot crisp

Apricot Crisp
From Smitten Kitchen

Fruit Base
1 pound apricots
3 tablespoons sugar
1 tablespoon flour
Grated fresh nutmeg, a pinch

Crisp Topping
1/2 stick (4 tablespoons, 2 ounces) butter, melted
6 tablespoons turbinado or regular sugar (turbinado, also sold as Sugar in the Raw, gives an excellent crunch)
1/2 cup oats
1/2 cup all-purpose flour (or a mixture of whole wheat and all-purpose flour)
Pinch of salt
2 tablespoons sliced almonds (I didn't have and almonds so I just used 2 more tablespoons of oats)

Prepare fruit: Preheat oven to 400 degrees. Pull apart apricots at their seam, remove pits, and tear them one more time into quarters, placing them in a small baking dish (one that holds two to three cups is ideal). Stir in sugar, flour and pinch of nutmeg.

Make topping: Melt butter and stir in sugar, then oats, then flour, salt and almonds until large clumps form. Sprinkle mixture over the fruit. Bake for about 30 to 40 minutes and serve warm. Or do as she mentions and I did, let it cool completely and then stick it in the fridge overnight, the flavors have time to combine and the apricots become a little less tart. Mix it with yogurt or even ice cream would be good!

Thursday, June 04, 2009

Coffee Cake and a lesson in Perseverance.

cherries

I’m just going to start this off by saying while this coffee cake isn’t bad, it’s not the best I’ve ever tasted.

That’s kind of how my day has gone. Not the worst, but not the best either. Could be better. I seem to be in a bit of a baking and photography slump lately. I haven’t made anything that has come out super amazing nor have I taken any pictures that I’ve really loved. I think we all go through periods like this, it’s just annoying when you’re in the middle of it.

cherry coffee cake

I try to be honest on this blog, and though I may seem to be a bit of a downer in posts like these, I swear I’m not! I’m a super happy person, even at times like this. If anything, it motivates me to do better, try again. I re-shot the photos for this post 3 times! And while I’m still not thrilled with them, I liked them a little more each time.

Same with the coffee cake, I’m sure I’ll try again soon, I’m thinking of using brown sugar instead of white, a different pan and changing up the streusel a bit (the cake seemed to eat the streusel, there wasn’t much left on the top when it finished baking!)


coffee cake

Perseverance is key in both baking and photography, or at least it seems that way to me. It took me a long time to realize that, but I’m glad I finally did.

Cherry Coffee Cake
from The Martha Stewart Baking Handbook
- 1 stick (1/2 cup) unsalted butter, room temperature, plus more for pan

- 2 cups all-purpose flour

- 1 teaspoon baking powder

- 1 teaspoon baking soda

- 1 teaspoon salt

- 1 cup sugar

- 2 large eggs

- 1 teaspoon pure vanilla extract

- 1 cup sour cream

- 1 cup frozen cherries, thawed and drained well

Streusel:

- ½ cup plus 1 tablespoon all-purpose flour

- 3 tablespoons packed light-brown sugar

- Generous ½ teaspoon ground cinnamon

- ¼ teaspoon kosher salt

- 4 tablespoons unsalted butter, room temperature

Milk glaze:

- 1 cup powdered sugar, sifted

- 2 tablespoons milk

1. Preheat oven to 350 degrees. Butter a 9-inch tube pan and set aside. (Both regular and removable-bottom pans can be used.) In a medium bowl, sift together flour, baking powder, soda and salt; set aside.

2. In the bowl of an electric mixer fitted with a paddle attachment, beat butter, sugar, eggs and vanilla on medium speed until light and fluffy, about 2 to 3 minutes. Add flour mixture in three parts, alternating with sour cream and beginning and ending with flour. Beat until just combined, scraping down the sides of the bowl as needed.

3. Spoon about half of the batter into the prepared pan. Arrange cherries in a single layer; avoid placing any cherries against the pan's edge, as they may stick or burn if not fully encased in batter. Top with remaining batter, making sure it is evenly distributed, and smooth with an offset spatula.

4. Make the streusel by combining flour, sugar, cinnamon and salt. Cut in butter with a pastry blender or fork until large, moist clumps form. Sprinkle evenly over top of cake.

5. Bake until cake is golden brown and springs back when touched, 40 to 45 minutes. Transfer pan to a wire rack set over a baking sheet and let cake cool 10 to 15 minutes. Invert cake onto rack and re-invert so streusel side is up; cool completely. Combine powdered sugar and milk, and spoon glaze over cake, letting it drip down sides. Let cake sit until glaze is set, about 5 minutes, before serving. The cake can be kept at room temperature, wrapped well in plastic, for up to 4 days.

Tuesday, June 02, 2009

Lemon Lime Ice

lemon lime ice

It’s hot y’all. Like, all of the sudden it’s gone from unseasonably cool to seasonably hot. And in Georgia, that means very very warm.

The ceiling fans have come on, and evenings on the porch are a must.

citrusy

All of this hot weather has slowed down my baking considerably. It’s not that I’m not baking - I am, it’s just for the farmers market and I’ve already posted nearly all of those recipes here. And when I’m done with that, I just don’t feel like trying new recipes. I’m sure I’ll get over it soon, because I have a list of about a thousand things I want to try, but for now, I give you this embarrassingly simple recipe for delicious shaved ice.

zesty

I found this recipe a couple of weeks back in one of those recipe magazines the big food companies send out, the ones where every recipe uses name brand ingredients and everything is super simple and dumbed down a bit? Yeah, those. I’d never found a single thing that looked worth making until I found this. It just looked delicious.

And it was! I have a feeling I’ll be making this several more times this summer.

lemon lime ice

Lemon Lime Ice

1 pkg. (3oz.) Jell-o Lemon Flavor Gelatin
1 cup water
1 cup cold seltzer
zest and juice from 1 lemon
zest and juice from 2 limes

Add 1 cup boiling water to gelatin in medium bowl;

Stir 2 min. until completely dissolved.

Stir in seltzer, zest and juice.

Pour into 9-inch square pan; cover.

FREEZE 3 hrs. or until firm.

Remove from freezer; let stand at room temp. for 10 min.

Use spoon or fork to scrape gelatin mixture into small pieces;

spoon into 6 dessert dishes.

P.S. A HUGE thank you to everyone who left tips on pie crust! Now I've got a ton of recipes to try, I can't wait!