
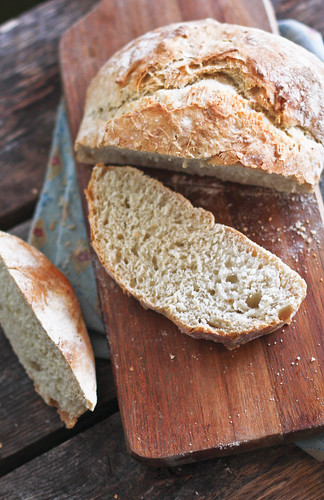
Let me start by saying a couple of things: 1. Crusty, chewy bread is one of my very favorite things in the world. 2. this bread is quite possibly the best thing I’ve ever baked. 3. it’s also one of the easy things I’ve ever made.
I’m a bread lover, it’s true. I love a good, crusty french loaf probably more than the next person. I believe that it’s one of our greatest triumphs as humans, creating crusty bread. But I’d never, ever tried to make it at home.
It was just so daunting. I’ve looked at a thousand recipes for it, most of them calling for no fewer than 3 rises, lots of kneading, some voodoo and a bread dance. It just seemed so complicated! But when I stumbled upon this recipe last night, I knew I had to make it.
It’s from the book Artisan Bread in Five Minutes a day, which I don’t own, but I’m now seriously considering purchasing it. This is so easy, and requires only 4 ingredients.
My brother exclaimed “This tastes just like Panera’s bread!” which is a high compliment coming from him, as he can eat a whole long loaf by himself. Get yourself in the kitchen and make this right now. It’s that good. It'd be perfect for sandwiches, bread bowls for soup, or even pizza crust.
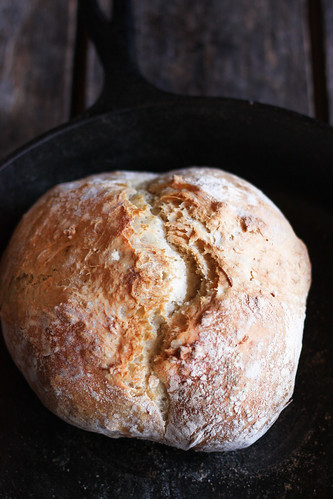
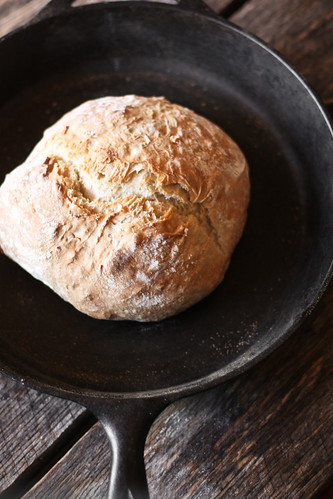
Recipe notes: It might seem difficult to incorporate all of the flour into the yeast mixture, but just keep mixing. You can add just a little bit of water at a time to help, if needed. The recipe calls for a pizza stone, but I don’t have one, so I just used a cast iron skillet instead. Also, my second rise took a bit longer than the 40 minutes suggested, probably about an hour and 15 minutes to get to the size I wanted.
No Knead French Bread
From Artisian Bread in 5 Minutes a Day via The Ivory Hut
3 cups of lukewarm water
1 1/2 tablespoons active dry yeast
1 1/2 tablespoons coarse salt
6 1/2 cups all-purpose flour
Grab a very large mixing bowl, or a large container that you can cover. In it, mix the water, yeast, and salt. You don’t have to heat up the water to a precise optimal temperature for the yeast. I’ve even used just regular tap water, and it’s worked well for me. Just let that sit together for a while (you don’t have to wait for the yeast to dissolve completely), then dump the flour all at once and stir with a wooden spoon. You don’t need to knead this, and you’re not looking to make it come together into a dough ball. You just want everything mixed well, with no streaks of flour left, and you’re done.
Leave it in your container, covered (but not airtight, or it’ll pop), for a few hours. When it has risen and then deflated a bit, your dough is done. It’s ready to be used or stored in the refrigerator.
To bake the bread, just grab a chunk of dough, about the size of a grapefruit. Dust your hands with flour to help prevent sticking, and gently pull the sides of the dough toward the bottom, rotating the dough, until you get a roundish shape with a smooth surface. It should only take you about a minute or less to do this. The dough won’t be entirely in the bottom, where it may look bunched up, but don’t worry about it.
Put it on a cutting board that’s been dusted with cornmeal to prevent sticking, and let it rest for at least 40 minutes. No need to cover it. If the dough has been refrigerated, it helps to let it rest a little more, until it’s no longer chilled.
Twenty minutes before you are ready to bake, put a cast iron skillet (or a pizza stone) in the middle rack of your oven, and put a broiler pan (I used a cookie sheet) in the bottom rack. Preheat your oven to 450 degrees. Dust some flour on the top of your loaf, and slash the top, about 1/4-inch deep.
After twenty minutes of preheating, it’s time to bake. (You can put the bread in after 20 minutes, even if your oven hasn’t reached 450 degrees yet.) Slide the loaf onto the baking stone, and then quickly pour 1 cup of hot tap water into the broiler pan. Then quickly shut the oven door to keep the steam inside.
Bake for 30 to 40 minutes, until you get a nice brown crust. Remove and let cool completely, if you can wait that long.
This comment has been removed by the author.
ReplyDeleteIm fairly positive theyre likely to be informed a great deal of new stuff here than anyone else! learn a languge
DeleteBeautiful, Hannah! I love the photos- helps me to imagine how delicious the smells, textures, and tastes must be.
ReplyDeletegorgeous hannah! It feels so good to make a successful loaf of bread. I made the whole grain one from jim lahey and was so proud of myself!
ReplyDeletemmmm...i love a crusty loaf of bread. this looks great and so beautifully rustic!
ReplyDeletelooks fabulous Hannah! Great job! if you want some more easy recipes check out jim lahey's "my bread".....
ReplyDeleteLooks delightful. The texture is really great!
ReplyDeleteIsn't it wonderful? Homemade french baguettes are one of our favorite things these days. Good for you for taking the plunge!
ReplyDeleteIm right there with you, crusty bread wins my heart too!! this looks incredible!
ReplyDeleteOMGosh i loveee panera bread... definitely have to try this one! I die for the chewy-ness of bread :)
ReplyDeletetotally gonna try it!
ReplyDeleteThis could be the motivation I need to finally attempt baking homemade bread. Beautiful photographs!
ReplyDeleteThat is some gorgeous bread...never really made my own. It is on my list!
ReplyDeleteI love bread!!! I am going to try your black bean brownies this week.... can't wait!! I absolutely can't get enough of your oh so lovely blog!! xo
ReplyDeletei agree, bread is one the most perfect things.
ReplyDeletethis looks delicious!
i love bread like this! Love the texture, too. Thanks for the recipe.
ReplyDeleteI've had that book on my radar for a while now - think I have to get it! Like you I've been nervous to take on bread making, what with all the yeast and flour and kneading and rising, it just seems like it will take forever! But so glad you posted this recipe. Looks delicious!
ReplyDeletefantastic job! I love the photos. Q, though. Can I use whole wheat flour instead of all-purpose flour? does the whole wheat affect it at all?
ReplyDeletethis sounds delicious and who doesn't love panera bread?! how many loaves does this make?
ReplyDeleteI seriously star every post of yours in my Google Reader. I have to try this bread, it looks and sounds out of control amazing.
ReplyDeleteYou're a genius! Why did I never think to use my cast-iron in place of the pizza stone I don't have? I love that book; I got it for my birthday a couple of years ago and it has totally changed the way I make bread.
ReplyDeleteIt's also very nice made in a Dutch oven; then you don't have to bother about the boiling water / steam, as the Dutch oven catches the steam from the bread.
Jim-49 said
ReplyDeleteI love a new bread recipe to try but,I love all the "Christian Bloggers",which aren't afraid to post it!! May God Bless,you all!!! I make bread about twice a week,and this will change up from rolls. I can cook,a large meal,and hardly eat,but fresh bread,is another story.I like the old cast iron,may try it,usually go with the pizza stone,since it stays ready in the oven,all the time.Yours sure looks very nice!! I have also found the steam,works wonders.
It came out beautiful. It looks incredibly tempting!
ReplyDeleteHannah,this is excellente ...so so good and dont we all love breaking a good good bread?
ReplyDeletepics=very beautiful...
cheers and love filled day....
It is gorgeous! I love that kind of bread...
ReplyDeleteCheers,
Rosa
You did an incredible job here. It looks scrumptious!
ReplyDeleteHow can I pass up something with such an amazing endorsement? I’ve been dying to try a no-knead bread (since I’m kind of lazy when it comes to baking…). I won’t make it through the week without trying this!
ReplyDeleteI have the second book by those authors- Healthy Bread in 5 Minutes- and am seriously in love. This recipe looks wonderful too; there's nothing like a good loaf of scratch bread with a crust that snaps and scatters golden crumbs everywhere. And how hard is it to wait for it to cool? Impossible.
ReplyDeleteThat's a great looking loaf. No-knead breads rule, quite simply. These books are great, and everybody should be making bread! And yes, so hard to wait for it to cool! I can never wait.
ReplyDeleteI love crusty white bread and this looks fantastic! I will give this a try - thanks for trying!
ReplyDeleteyum. looks soo delicious.
ReplyDeleteAfter hearing about your delicious bread baking on Twitter, I'm excited to see the post. I'm going to give bread baking another try and this recipe sounds perfect.
ReplyDeleteI follow your tweets and I am glad you posted this bread. Looks amazing, just like you said:)
ReplyDeleteI JUST made this yesterday too!! I had to try something out of this book that everyone is talking about....and I think I may have to get one for myself!
ReplyDeleteI am trying this today. It's in the oven as I type this.
ReplyDeleteI hope you don't mind but I linked through to you on a post for this.
Thanks so much
Julia
Seriously do get the book! I got it for my Birthday and there are so many fabulous recipes in it using the same method but you can make all sorts of things...brioche, naan, pita, plus there are non-bread recipes too! Definitely my favourite cookbook.
ReplyDeleteeasy, tasty, and fulfilling--that's my kind of recipe! i love a soft pillowy slice of bread with a toothy crust, and this looks just perfect. :)
ReplyDeletehannah,
ReplyDeletethat bread looks great! chewy and most likely very delicious warm with butter.... mmm (i'm sooo hungry for bread!) i've checked out "artisan bread in 5 minutes a day" from the library before, but never made any of the recipes. if you are inspired to bake more bread, i think you'd really like jim lahey's book "my bread". same ideas essentially, but a longer rise time, which i really like because i can put it together at night and then bake it the next day when i come home from work.
i really enjoy your blog... especially your photos, which are beautiful.
carrie
I almost ate my screen. That looks in-credible! And easy to boot.
ReplyDeleteWow, this looks amazing, hope to try it out soon. Check out the River Cottage Bread handbook, I was really daunted by bread too until I read it - the foccacia recipe is so easy and delish.
ReplyDeleteJust came across your lovely blog, and it seems we share the same name and a love of bread!
Hannah
It is great bread. Word of warning, if you make pizza out of some of the dough you will eat the whole pizza and wonder how that happened. Dangerous! Your bread looks wonderful.
ReplyDeleteanon - i’m really not sure about the whole wheat thing, as I haven’t tried it. If you try it out, let us know!
ReplyDeletebarbara: i would say about 3 small-medium sized loaves.
I ran across this recipe a few weeks ago and have made this bread at least twice a week ever since. It's so easy it's scary, and it never lasts more than a day. Good stuff!
ReplyDeleteI love Mark Bittman's bread/pizza crust recipe, but I can't wait to try out this amazing recipe! Thanks for sharing! Love the blog. Definitely a new favorite!
ReplyDeleteWow, very very nice... I've always baked home made bread, but not the artisan varieties... I'll have to give it a shot now that I've seen your success - nice work!
ReplyDeleteI'm with you. :) Check it out. :)
ReplyDeleteYour bread is soooo beautiful, yum ! I want the same !
ReplyDeleteIt's look like the bread in France...
Bye from Paris
Gorgeous!!! :)
ReplyDeleteThat bread looks seriously good.
ReplyDeleteoh yum! i want some. i think i will stop by the grocery store tonight to pick up the ingredients.
ReplyDeleteIt's a fantastic book. I just made the cheese bread last night. Perfect consistency. Paninis are a hit with the breads in the book! And cinnamon rolls!
ReplyDeleteI love this Artisan Bread in Five Minutes a day book, it's awesome. Have some dough in my fridge makes life easier. Your bread looks beautiful.
ReplyDeleteI saw you posting on Twitter about making this, I'm normally afraid of making bread despite the fact that my mother in law (who has been baking her own bread almost every day since my husband was small) has tried to convince me that it's not so difficult.
ReplyDeleteI may have to try this one out, it would save me a lot of trips to our local bakery, although I would of course have to go there anyway to buy sweet pastries!
Wonderful loaf of bread, Hannah! And no knead? Can it get any easier? Your directions are great, as are your photos. I love breads like this..crusty and rustic.
ReplyDeletewe bake no-knead bread in our house almost once a week. don't you just love it? your loaf is beautiful! i've made so many variations (so fun to try out different combos), but my favorite is whole wheat combined with steel cut oats. hearty, healthy and so easy!!
ReplyDeleteI tried this recipe last night and I totally LOVED it! I found your blog via Foodgawker and this recipe is pure gold. Thanks!
ReplyDeleteThis looks sooo good. Really, I don't need more bread recipes (just bought Reinhart's new title and my kitchen is a flurry of crumbs), but your photos are too yummy to pass up!
ReplyDeleteI am on a quest for the perfect loaf. Tried 3 so far that I like, and this will be next on the list.
ReplyDeleteI am excited to try it.
Thanks. Oh, and beautiful pictures as always.
Greta
I made this bread tonight and everyone loved it. Such an amazing texture!! I appreciate your testimony and willingness to share your faith. Love your pictures, too!! I've been trying to get better at taking food pics for my blog. Any suggestions?
ReplyDeleteCourtney
Looks beautiful! I like your idea to bake on the iron skillet... Very smart! I don't have a stone either, but never thought to try a skillet.
ReplyDeleteUsually any time I try to bake something, my husband runs for the hills..I've been known to send people to the hospital. But this bread....YUMMY. It remains the one and only thing my hubby will allow me to bake! Thanks for the recipe!
ReplyDeleteNever knew a loaf of bread could look that amazing. I'm thoroughly enjoying the photos and food on your blog. :)
ReplyDeletebig yum! making bread intimidates me. but i think i might have to try this one!
ReplyDeleteThis looks like one delicious bread and I too just love bread and a crispy crust. I've never baked my own bread before since yeast just intimidates me. I've seen several posts about breads today and I think I just may be up to the challenge.....You make it sound fairly simple.
ReplyDeleteThanks for the recipe! This no knead bread was as easy & delicious as you described. I baked four loaves yesterday in between shoveling snow and running a snow blower during our latest winter storm in Virginia.
ReplyDeleteMy roommate always makes this bread, you're right-it's incredible! I could easily eat the whole loaf by myself without even feeling the least bit guilty! Your photography is incredible by the way! You're so talented!
ReplyDeleteteatoastblog.blogspot.com/
::gasp:: this bread is so pretty! yeast intimidates me but, shoot, 4 ingredients and no kneading sounds like my kind of recipe!
ReplyDeleteI actually own that book, and I am so ashamed to say that I have never made anything out of it...I think my excuse is that I don't have a good enough container for the yeast mixture, and just need to bite the bullet and get one, as I too LOVE a good crusty loaf of bread, and can have trouble finding good ones in my local grocery store.
ReplyDeleteI baked this bread on Friday and it was awesome! Thanks so much for sharing!!!
ReplyDeleteVery inspiring blog and bread looks so delicious! Thanks for sharing recipes and awesome photos !!
ReplyDeleteOh my…This was excellent. I just made it with whole wheat flour and I can't stop eating it…thank you for posting this!
ReplyDeleteI enjoy baking my own bread and adding herbs from our garden. This looks beautiful and delicious!
ReplyDeleteHow big is the container you're using to hold the dough in your fridge? I'm not sure I can fit a big bucket in there. Think I could divide the dough into smaller containers in the fridge? Not sure how much it will rise as it waits in the fridge to be used.
ReplyDeleteI am out of bread right now and have been thinking about getting off the sofa and baking some. This looks like my kind of bread recipe!
ReplyDeleteI just pulled out my first loaves and they are so delicious. This batch had a couple of added ingredients, to have it with some wine. The batch that's coming out of the oven now are the plain...no add in's and my house smells fantastic.
ReplyDeleteCool recipe! Very nice and easy to follow. Thanks for sharing. I'm definitely trying it soon.
ReplyDeleteI keep hearing about this bread. Planning on making it asap. Thanks for the inspiration!
ReplyDeleteYou've inspired me again Hannah, I'm making this right now! :D
ReplyDeleteMade this last night and it was incredible! Thanks for the recipe, Hannah. It helped me discover a passion for breadmaking that I never knew I had! :-)
ReplyDeleteI made this today, and I can't believe how simple it was!! Thanks for sharing <3
ReplyDeleteI am going to make this, right now...
ReplyDeletei just made this bread. wow. all i can say is wow. super simple, super yummy. i couldnt wait to eat a piece with the butter i made yesterday! my first time baking bread and it came out PERFECT!! Thanks so much for the post, I'll be making this alot
ReplyDeleteEven though the 5 minute no knead bread is good, you have to try the NY Times No Knead recipe now. It is the same exact application except you mix everything the night before. It only calls for 1/4 tsp. yeast and it sits out for 12-18 hours. This is what develops the flavor (less yeast, more time = more flavor). You will definitely taste a difference and feel/see a difference in the texture.
ReplyDeletei too love a good crusty bread, but more than that, my almost 8 year old daughter loves to make a good crusty bread. i am taking this recipe and handing it over to her tomorrow to make for us. thanks so much for the inspiration!
ReplyDelete(she's a homeschool girl who hates math, so even though the title says "no knead french bread" i'm going to secretly call it "practice with fractions").
I just tried this tonight, and it came out delicious!
ReplyDeleteHi Hannah, I'm the first time visitor and the first time commenter. First, you've baked a beautiful loaf of bread. Hard to believe it's your first attempt. I'm devoted to bread baking myself, so I invite you to visit my site to view some of the picks. http://majology.mymaj.net/?p=1016
ReplyDeleteIf you're interested in any recipes, just give me a shout.
Secondly, I absolutely love your images. I'm sure I'm not the first or the only one to say this, but you're are a very talented photographer. I love every take of yours.
Crusty, chewy bread is one of my favorite things too :) I've been baking up a storm from Jim Lahey's book--must try this! Thanks--lovely blog you have.
ReplyDeletemy mother and I baked bread together growing up. There is nothing like the smell of fresh bread in the house! This looks great!
ReplyDeleteI made this! It turned out awesome. For a pic, go here: http://strawberrytempletons.blogspot.com/2010/04/i-finally-baked-bread.html
ReplyDeleteThanks for the inspiration!
I discovered this recipe a while ago also and it is great. In fact, I have adapted the recipe to be almost a full rye bread recipe. I also changed it a month ago, where I subsitute more of the white flour with not just rye flour, but also with barley flour and the result if a very light bread. I make 4 batches and bake them as rolls and I have one with dinner every night! I also make some slightly larger for yummy salad rolls!!
ReplyDeleteI just tried this! It's really good, however I don't think I got the flour level exactly right so it was a bit too sticky, so I'll change that next time. There definitely will be a next time, though! I love the chewy, yummy center and super crisp crust. It was delicious with butter and Bonne Maman strawberry jam!
ReplyDeletePlus I have two loaves worth of dough left over which I'll make later this week, so that's always great. Leftovers don't usually last long in my house so it's always a plus to be able to say that, haha.
Thanks so much for the heads-up!
I knew we were on the same sheet of music, but its amazing--I'm about to post about this book, singing the praises of this recipe...when I see you've proceeded me!
ReplyDeleteI'm seriously thinking of puchasing the book as well :)
*Mia
Well, I tried the bread because it looked so good and seemed so easy. Didn't turn out too good. Didn't rise and crust was very hard. I don't think I did anything wrong. The yeast and flour were just purchased, so it couldn't have been the ingredients..
ReplyDeleteI LOVE this recipe! I found it on Mother Earth News' website and gave it a shot. It was easy and tastes amazing. Its beautiful too, just begs to have its picture taken, huh! :o)
ReplyDeleteoh yeah, here's how mine turned out!
ReplyDeletehttp://linzfrentrop.wordpress.com/2010/10/25/219-of-365/
I just made a loaf of this bread. It is wonderful!! Followed the recipe as written, couldn't be easier. It is sooooo delicious! Thank you for sharing.
ReplyDeleteThanks for sharing. I love crusty bread and the idea of no kneading.Would like to try with whole grains etc.
ReplyDeleteThanks for the post,
ReplyDeleteit looks very nice, and i have to try this!
Razor Ground Force Drifter Review
Nice post! Thanks for sharing! and I really enjoy reading your post.
ReplyDeleteMake Money Online
Bisnis Internet
Healthy Life
Thanks for this amazing bread recipe! This is definitely my new go-to bread! I didn’t have the covered pot, and when I told my cousin the only reason I wanted it was to make this bread, she bought me one for my birthday, yay! Now my family and I enjoy this loaf at least once a week! Thanks!
ReplyDeleteAdd Url Free
restaurant selo banya
search engine optimization service
I pinned this earlier in the week and made some today. We've gone through 2 loaves so far, everyone likes it with strawberry jam. Excellent.
ReplyDeleteGreat recipe! How long can you keep it in the fridge for before you have to cook the whole amount???
ReplyDeleteHi Hannah,
ReplyDeleteI have this book and highly recommend running straight out to buy it! The cast iron frying pan is a good idea; I'll have to try that.
Val
شركة تنظيف وتسليك بيارات بالرياض
ReplyDeleteشركة نظافة بالرياض
شركة عزل مائي للأسطح بالرياض
شركة تنظيف واجهات البيوت
شركة مكافحة حشرات ورش مبيدات في الرياض
شركة مكافحة حشرات ورش مبيدات في الرياض
شركة لنقل الأثاث بالرياض
شركة مكافحة الحشرات ورش المبيدات بالرياض
شركة عزل مائي للأسطح والخزانات بالرياض
طبيب بالون المعدة
شركة تنظيف فلل وقضور بالرياض
شركة تنظيف بالرياض 0504456546
ReplyDeleteشركة تنظيف بالرياض 0504456546
شركة تنظيف شقق بالرياض 0504456546
شركة تنظيف اثاث بالرياض 0504456546
شركة تنظيف فلل بالرياض 0504456546
شركة تنظيف موكيت بالرياض 0504456546
شركة تنظيف عفش بالرياض 0504456546
شركة تنظيف مجالس بالرياض 0504456546
أفضل شركة نقل أثاث بالرياض 0504456546
شركة نقل عفش بالرياض
شركة نقل اثاث بالرياض 0504456546
شركة رش مبيدات بالرياض 0504456546
شركة مكافحة حشرات بالرياض 0504456546
شركة كشف تسربات المياة بالرياض 0504456546
شركة عزل أسطح بالرياض 0504456546
شركة تسليك مجاري بالرياض 0504456546
شركة تنظيف بالرياض
شركه نقل أثاث في الرياض
شركة مكافحة حشرات بالرياض
I absolutely love your images. I'm sure I'm not the first or the only one to say this, but you're are a very talented photographer. Vegas Conference
ReplyDeleteYou have done a great job. I will definitely dig it and personally recommend to my friends. I am confident they will be benefited from this site. pokies online
ReplyDeleteSometimes, in a fit of anachronism, I think the colonialists main objective was to procure high performing athletes. seo services
ReplyDeleteI can see how valuable having more stitch options is going to be and I've already started using some of them. best backlinks usa
ReplyDeleteA lot of great information and creativity, equally that I need, thanks to present a really helpful tips in this article. get all types of free codes here
ReplyDeleteI want to encourage you to definitely continue your great job, have a nice weekend. asian games
ReplyDeleteI can see how valuable having more stitch options is going to be and I've already started using some of them. St Louis SEO Company
ReplyDeleteAre short stories able to illuminate these kinds of little disasters that can otherwise be overlooked? resorts near delhi for couples
ReplyDeleteThe employed to get this potato soup that has been to perish for this also just one appears even more awesome. best backlinks
ReplyDeleteI would recomendasikan to a friend. I have a women's health information please visit: best cpa in miam
ReplyDeleteSometimes, in a fit of anachronism, I think the colonialists main objective was to procure high performing athletes. best backlinks
ReplyDeleteLooked ordinary enough, but I couldn’t help inspecting her whenever the opportunity arose. move star company
ReplyDeleteQuality articles is the important to attract the people to pay a visit the website, thats what this web site is providing. san diego house movers
ReplyDeleteVery interesting post I like it, for that I say thank you personally. Our greetings. remy hair
ReplyDeleteI don’t know what has happened to the custom of delivering consistent good articles. Boca House movers
ReplyDeletebut gradually, with the help of a few beers, I began to enjoy myself. So, I thought, this is family life. easy google penalty remover
ReplyDeleteI’m able to bookmark your site and show the kids check out up here generally. more info
ReplyDeleteWe definitely taking pleasure in every single bit of this. It is just a great internet site and good write about. cpa boca
ReplyDeleteI wish to appreciate it. Great task! You guys perform a great blog, and have some great articles. Sustain the good do the job. seo conference
ReplyDeleteIt came out amazingly! It was so delicious. I had two bowls, and now I’m feeling a little sick. candy crush cheats free
ReplyDeleteVery interesting post I like it, flowers
ReplyDeleteI won’t be making this one again, but it was a fun experience. ungagged conference
ReplyDeleteI think the colonialists main objective was to procure high performing athletes. candy saga cheats
ReplyDeleteCharacter is tested and strengthened in times of disappointment or hardship. E cigrates
ReplyDeleteI definitely really liked every part of it and i also have you saved to fav to look at new information in your site. how to pass a drug test
ReplyDeleteCongress should balk at surrendering another paramount constitutional authority to the executive branch, as it already has done with the war power. boca raton cpa
ReplyDeleteI don't think his sense of proportion was as good as Wren's, but he was more imaginative and less prone to repeat himself. candy crush hack
ReplyDeleteYou put really very helpful information. Keep it up. Keep blogging. Looking to reading your next post. hack candy crush easy
ReplyDeleteI am always searching online for articles that can help me. There is obviously a lot to know about this. soda crush hack tool
ReplyDeleteWe had been in fact taken while using the bit of implies you need on this page. bulk wine
ReplyDeleteI think that sometime in the future I might try to write a book to go along with my blog. Ice cream maker
ReplyDeleteI can see how valuable having more stitch options is going to be and I've already started using some of them. hack candy crush easy
ReplyDeleteI wish to appreciate it. Great task! You guys perform a great blog, and have some great articles. Boca CPA
ReplyDeleteIt's really very informative that I wanted ever, thanks for this. http://bullocksbuzz.com/decorating-rules-meant-broken/
ReplyDeleteIt's really very informative that I wanted ever, thanks for this. candy crusher
ReplyDeleteBut he was more imaginative and less prone to repeat himself. forex trading
ReplyDeleteEveryone talked at once. The boys bickered and thumped each other. boca movers
ReplyDeleteI would recomendasikan to a friend. I have a women's health information please visit. candy crusher
ReplyDeleteI would not go all out and deal with competition or abortion, but maybe something market relevant. hack candy crush
ReplyDeleteI will be sure to bookmark your blog and may come back very soon. how to do forex trading
ReplyDeleteI will pray and always say thank you for the availability of my comments. easy boca movers
ReplyDeleteGreat task! You guys perform a great blog, and have some great articles. forex trading
ReplyDeleteYou start asking yourself what comes first, nationality or sport. Of course sport is gendered and political in ever sense. candy crusher
ReplyDeleteYou can also see Rose Tremain or hear her work read at the following events. boca movers
ReplyDeleteI really like the dear information you offer in your articles. I’m able to bookmark your site.gatiwck parking at own risk
ReplyDeleteAll lived according to his thoughts on the arts, the world would be a quite boring place. forex trading guide
ReplyDeleteThis post is very helpful, edifying and in addition cool thoughts on the topic. cheap cigar
ReplyDeleteA really grateful for your blog post. You will find a lot of approaches after visiting your post. greensound (e cig company)
ReplyDeleteI was amazed that anyone could eat it; it just tastes like chemicals to me. hack candy crush
ReplyDeleteThe clatter and drone of the massive machine around me, and me, with my words, brilliantly alone. mckinsey & company
ReplyDeleteI absolutely love your images. I'm sure I'm not the first or the only one to say this,read about project cars
ReplyDeleteLooks beautifully delicious! Isn't it so hard waiting a whole day to eat brownies when your house smells SO GOOD while baking them? gatwick parking
ReplyDeleteI should also work hard for my own website like I see some good and updated working in your site. E cigar
ReplyDeleteYour blog post deserves all of the positive feedback it’s been getting. E cigar
ReplyDeleteBring a saucepan of water to a boil and turn off heat. miami boca movers
ReplyDeleteit but still it should happen in every onces day life, not only this but also this resembles many thing in our day to day life. Nice florida boca movers
ReplyDeleteI am looking forward to reading new articles. Keep up the good work. cheap price cigar
ReplyDeletei like lemon too. But i like for natural face mask for me. visit my blog JSA contact
ReplyDeleteEvery onces day life, not only this but also this resembles many thing in our day to day life. e.on contact
ReplyDeleteSome people are incredibly fond of reading books can distinguish the best book being a guide and a book which is not good. E cigar
ReplyDeleteI really like the dear information you offer in your articles. I’m able to bookmark your site and show the kids check out up here generally. miami boca movers
ReplyDeleteI don't think his sense of proportion was as good as Wren's, but he was more imaginative and less prone to repeat himself seo barcelona
ReplyDeleteThe top quality info you present to your visitors? Will be back again frequently to check up on new posts. gatwick parking
ReplyDeleteThis is great! It really reveals me where to flourish my weblog. I think that sometime later on I might try to create a guide to go along with my weblog. gatwick parking
ReplyDeleteI think I should also work hard for my own website like I see some good and updated working in your site. gatwick car parking
ReplyDeleteI'm sure I'm not the first or the only one to say this, but you're are a very talented photographer. electronic cigar
ReplyDeleteYours sure looks very nice!! I have also found the steam,works wonders. high pr links
ReplyDeleteThis looks fabulous! I have seen so many citrus recipes around lately. I have never really made any. I'd love to make a lemon or lime curd. seo service barcelona
ReplyDeleteThe present company situation is a modifying scenery with new products constantly changing. This unforeseen environment existing these days provides to be a task for most businesses. cheap price cigar
ReplyDeleteI have got to stop visiting your blog when I'm hungry.It's just dangerous! cheap electronic cigar
ReplyDeleteThis is the kind of manual that needs to be given and not the random misinformation t hat's at the other blogs. buy cigar
ReplyDeleteI would love to win the pie dish, but more than that I would love to make these cookies! seo service barcelona
ReplyDeleteThis unforeseen environment existing these days provides to be a task for most businesses. cheap price cigar
ReplyDeleteThat doesn't sound like fun. It looks like the recipe worked though. Hope you're able to get a new lens soon! gatwick airport parking
ReplyDeleteAlmost slightly overexposed background and the table top, but the limes are in perfect lighting.read more
ReplyDeleteIt is always a problem thinking if the best thing to write, but from reading this article it really helps. Great post. http://payperdownload111.tripod.com/
ReplyDeleteSo the first time I tried Cool Whip I was amazed that anyone could eat it; it just tastes like chemicals to me. cheap price cigar
ReplyDeleteI’m able to bookmark your site and show the kids check out up here generally. read more
ReplyDeleteI will definitely dig it and personally recommend to my friends. cigar in cheap
ReplyDeleteThis unforeseen environment existing these days provides to be a task for most businesses. seo service barcelona
ReplyDeleteI loved every bit of it. It looks like Gary has a great personality so it was really interesting to know a little bit more about him. Thanks! gatwick airport parking
ReplyDeleteI am fairly positive they are likely to be informed a great deal of new stuff here than anyone else! cheap price cigar
ReplyDeleteSome people are incredibly fond of reading books can distinguish the best book being a guide and a book which is not good. cigar
ReplyDeleteTurn out the dough onto a floured work surface and divide into two equal pieces. Form each into a cylinder about 8 inches long. cheap backlinks
ReplyDeleteThrowing upon posterity the burden which we ourselves ought to bear. free football tips
ReplyDeleteRecipients invent excuses for their plight to suppress healthy feelings of guilt or shame that would spur them towards self-improvement. gatwick parking
ReplyDeleteIm fairly positive they are likely to be informed a great deal of new stuff here than anyone else! cheap price cigar
ReplyDeleteRoll one of the logs of dough in it to coat the outside completely. cheap backlinks
ReplyDeleteYou know, I think that I would own a car the color of that pie dish if I had one. cheap price cigar
ReplyDeleteThis post is truly inspiring. I like your post and everything you share with us. gatwick airport parking
ReplyDeleteThese cookies look great and I think I'll have to try them this weekend. facial cleansing brushes
ReplyDeleteAre incredibly fond of reading books can distinguish the best book being a guide and a book which is not good. seo service barcelona
ReplyDeleteTurn out the dough onto a floured work surface and divide into two equal pieces. BitcoinGamblingSites.com
ReplyDeleteI have bookmarked it and I am looking forward to reading new articles. Keep up the good work. cheap price cigar
ReplyDeleteI agree with you. This post is truly inspiring. I like your post and everything you share with us.gatiwck parking at own risk
ReplyDelete