
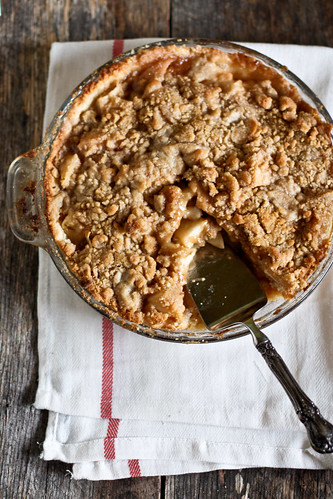
I didn’t have high hopes for this pie. Actually, my hopes were about a low as you can get them.
As I’ve mentioned before, pie crust and I are mortal enemies. We do not get along, I haven’t been able to find a fool proof recipe that I can actually make without completely screwing it up.
Until now, thanks to Joy the Baker. Joy, you are my hero with this pie crust. It’s SO easy to put together. You just throw it into the pie plate, squish it down and you’re good to go.
When I took a bite, I swear I heard the hallelujah chorus from above. It’s good. Very good.
And so is the rest of this pie! Which I kind of just threw together, to be honest. I knew I wasn’t going to have a top crust, but since I wanted a picture for Still Life With (which you should check out!) I need something for the top. And I think it’s pretty well known on this blog how much I love crumbly toppings.
The pie filling is a combination of two recipes, one from Food and Wine, the other from All Recipes. It’s cinnamon-y, but the pear taste really shines through.
So if you, like me, are afraid of pie crust, you should try this out! You’ll be surprised by how good AND easy it is!

No Roll Pie Crust
From Joy the baker (check her out for step by step pictures! they are so helpful.)
1 1/2 cups all-purpose flour
3/4 teaspoon salt
2 Tablespoons sugar
1/8 teaspoon baking powder
1/4 cup (4 Tablespoon) frozen butter that has been grated on a cheese grater
1/4 cup vegetable oil (I used safflower oil, it was all I had.)
1 Tablespoon cream cheese, at room temperature
2 Tablespoons cold milk
In a medium sized bowl combine flour, salt, baking powder and sugar. Whisk together.
Add frozen butter that has been grated on a cheese grater and tablespoon of cream cheese. With your fingers, work the cream cheese and butter into the flour mixture, breaking the butter and cream cheese up until they’re in well incorporated into the flour. Some butter bits will be tiny, other the size of small peddles. The dough may even begin to some together in a rough, sandy kind of way.
Combine the milk and oil. Whisk together. Add all at once to the flour and butter mixture. With a fork, begin to combine the ingredients, making sure that all of the flour mixture is introduced to the liquid. The mixture does not need to come together into a ball. Leave it a bit shaggy and dump the dough into a clean 9-inch pie plate. With your fingers, press the dough evenly into the bottom of the pie plate and up the sides. Try to get the dough as even as possible, but don’t worry too much about finger indentations. You can’t fight that.
Place the prepared crust in the freezer while you preheat the oven and prepare your filling. If you’re going to pre-bake your crust, heat the oven to 350 degrees F and line the chilled pie crust with foil, weigh down with beans and bake for 10 minutes covered. Remove the foil and beans and bake for 4-6 minutes uncovered until golden brown.
If you need an unbaked pie crust, simply remove the crust from the freezer once your filling is made, fill your pie and place in a preheated oven. Bake according to your particular recipe.
Crumb Topping
Makes 2 cups
1 1/2 cups all-purpose flour
3/4 cup light-brown sugar
1/3 cup granulated sugar
1/4 teaspoon salt
1/2 teaspoon cinnamon
1 1/2 sticks chilled unsalted butter, cut into pieces
In a bowl, mix 1 1/2 cups flour, 3/4 cup light-brown sugar, 1/3 cup granulated sugar, and 1/4 teaspoon each salt and cinnamon.
Cut 1 1/2 sticks chilled unsalted butter into pieces. With your hands, work in butter pieces, until large clumps form. Place in refrigerator until you need it.
Pear Pie Filling
3/4 cup white sugar
3 tablespoons all-purpose flour
1/4 teaspoon salt
1 teaspoon ground cinnamon
1 teaspoon lemon zest
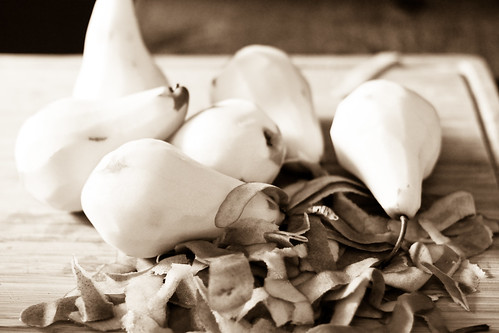
5 cups peeled and sliced pears
1 tablespoon butter
1 tablespoon lemon juice
Combine sugar, flour, salt, cinnamon, and lemon rind in mixing bowl.
Arrange pears in layers in a 9 inch crust lined pan, sprinkling sugar mixture over each layer. Sprinkle with lemon juice.
Top with Crumb topping.
Bake at 450 degrees F (230 degrees C) for 10 minutes. Reduce temperature to 350 degrees F (175 degrees C), and bake for an additional 35 to 40 minutes.
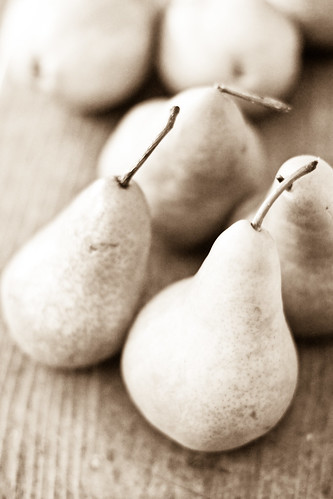
Just a word of advice: cut your pears smaller than I did! Not all of mine were as soft as I would have liked.
the black and white photo of the pears lolling about like fruity odalisques in piles of their own skin looks downright erotic. if I were a pear, these are pears I'd wolf whistle at, for sure. lovely post!
ReplyDeleteThat pie sounds really delicious!
ReplyDeleteYum! I love crumb pies... so tasty! Your pictures are beautiful, too. I love the one with the peeled pears!
ReplyDeleteStrangely enough...I have never even heard of pear pie until now. It looks delicious!
ReplyDeleteHave you checked out Deb's Pie 101, 102, 103 series over at Smitten Kitchen? I made my first successful pie crust with her help.
ReplyDeletehttp://whitneyinchicago.wordpress.com/2009/09/20/perfectly-pie/
Cool! Do you think that pears could be substituted for apples and still have it taste as good?
ReplyDeleteLooks lovely! I love fruit pies, but I hate peeling fruit. Such a problem! Love the pictures, too.
ReplyDeleteI was totally going to recommend Deb's pie tutorials as well! They helped me concur my fear of making all-butter crusts. :)
ReplyDeleteI'd never had pear pie either, but your pear picture was so lovely I went to the grocery store at 10:30 at night just to make this pie!
*and just to clarify, I can totally make this recipe with a crust that hasn't been pre baked, correct? Thanks!
Be-you-tee-full! I have a bowlful of pears that just might tumble into a pie like this. I have used a pate brise for years, but this looks very intriguing, especially with the addition of the cream cheese. Ayum!
ReplyDeletemicah: that’s crazy! make yourself one. : )
ReplyDeletewhitney: i haven’t! I’ll be sure to check it out.
lady jess: sure! that’d be great.
anon: yes, no need to pre-bake the crust!
I just saw an episode of ATK with this pie crust: http://www.americastestkitchen.com/recipes/login.asp?recipeids=4629&LoginForm=recipe&iSeason=9 Might be worth a try! (Not that I don't believe you about your delicious results here!)
ReplyDeletePie crust is so easy and fun with a little practice. I use the Baking Illustrated pie crust, which is 1/2 butter, 1/2 shortening. It is much easier to work with than all butter and browns and has flavor unlike all shortening recipes.
ReplyDeleteThe best thing to do is get a stainless steel or ceramic (I got mine at an antique store) rolling pin and stick it in the freezer before using. Also, rolling it out in between wax paper makes it so easy to transfer!
with all the pears sitting in my kitchen, this looks like the perfect opportunity to use them. thank you!
ReplyDeletelove the photo for "still life with" and of course, i love a crumbly topping too!
ReplyDeleteThat is my new favorite pie crust recipe. Love the monochrome pear pics. Just lovely! Your pie looks delicious.
ReplyDeleteSpeaking of pie crust, it's been a long time since making one. Glad you were able to make a no roll crust. Your photos are always gorgeous. Love the pear pie.
ReplyDeleteCongrats that you have conquer your fear of crust. This looks delicious and well done.
ReplyDeleteGood Job Hannah!! Beautiful!
ReplyDeletePie crust and I are mortal enemies too! I just made some... but gluten free (dear God!) because I have to be gluten free for a while - we'll see how it turns out..
About my lens.. I use a 24-105mm - it came in my D5 kit. ;) There are so many other great lenses on my "to get" list! ... someday.
I have tried a no roll crust myself... It's a great idea for someone like me who is decidedly "baker challenged"! GREG
ReplyDeleteI've never had pear pie.. but perhaps I should now after seeing your post! And I love the no roll crust.. this is the only way I make crust.. I call it the "Cheater's Way" but Shhhh.. lets just keep that between you and I, shall we?
ReplyDeletei don't mind rolling out pie crusts, but if i can skip that tedious step, all the better. lovely pie, hannah!
ReplyDeleteYou know what - I haven't even attempted a pie crust. What a slacker.
ReplyDeleteThat sounds great! I have making pie crust too, such a hassel! Loving the new header too so cute :)
ReplyDeleteI don't even like fruit pie, and this looks like something I just need to make!
ReplyDeleteAlso, your autumn-y plate set makes me want to run to World Market to pick up some fall-themed dinnerware of my own :)
I love the photos, especially the black and white ones! The pie looks delicious!
ReplyDeleteOh, how I loves me some pears!! This pie looks lovely. And the book? Be still my heart. What a story that story could tell. Lovely.
ReplyDeleteL.
I'm a sucker for fruit pies and crumbly toppings too, so I'll have to try this. And I don't do crusts either...
ReplyDeletebeautiful pictures as always!
Love the photos ... and the dessert doesn't sound half-bad either!
ReplyDeletehi hannah {one of my favorite names}, your blog is WONDEFUL! I'm a a newcomer but you have def. become one of my favorites!
ReplyDeleteGod bless you!
princess
Cream cheese pie crust is SO EASY! It still comes out tender and a little flaky (though not as light as butter-only or shortening pie crust) and you can handle it as much as you want. You still have to chill it, but not as long (only about 30 mins) and it browns deliciously.
ReplyDeleteP.S. Those are IKEA dish towels! I have them and I love them. Yay IKEA!
That pie looks delightful! Wonderful!
ReplyDeleteCheers,
Rosa
This comment has been removed by a blog administrator.
ReplyDeleteso happy to have stumbled upon your blog. i am longing for fall weather and this pie looks absolutely delicious!
ReplyDeletelove your photographs too!
HI,
ReplyDeleteGreat Blog I appreciate the blog for this very informative information .....
find doctor list
Hi, has the crust to be prebaked before filled and baked again?
ReplyDeleteThank you for sharing ..!!
ReplyDeleteشركة تسليك المجارى بالرياض
ReplyDeleteشركة تنظيف بيارات بالرياض
شركات كشف تسربات بالرياض
كشف تسربات المياه بدون تكسير
اصلاح تسربات المياه
شركة عزل خزانات بالرياض
شركة عزل اسطح بالرياض
شركة تنظيف خزانات بالرياض
عزل مائي
شركات العزل الحراري
تخزين عفش بالرياض
تخزين عفش
شركة تخزين اثاث بالرياض
افضل شركة نقل اثاث بالرياض
افضل شركة نقل اثاث
نقل اثاث